
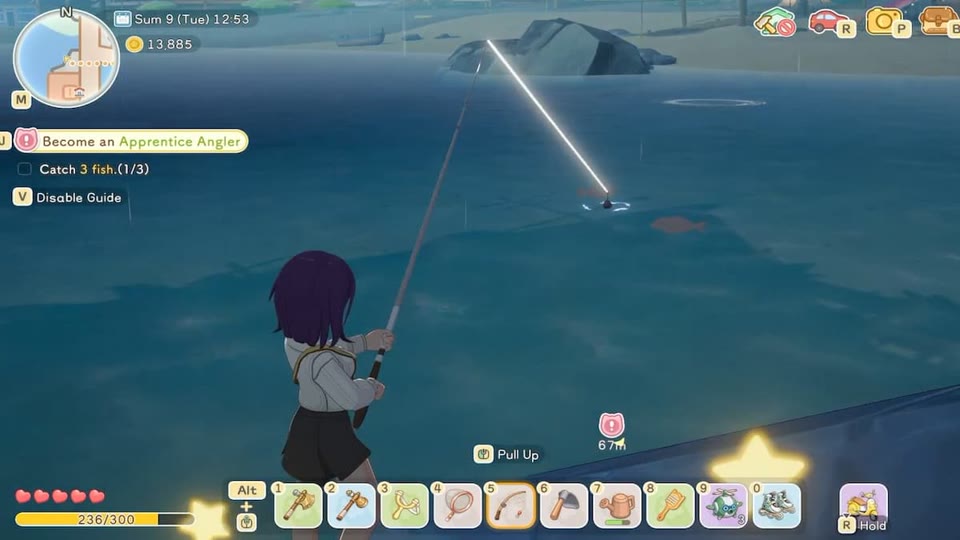

Throw bait into the water to create or gather shadows. Use a net for bulk catches, a rod for targeted and King fish, and fed traps for overnight output.
Fishing success is a five-condition problem: season, weather, time, habitat, and bait. Early fishing usually requires a visible fish shadow.
Read the cast indicator and line warning
A green landing indicator means the cast is valid. Red usually means an obstruction or water that is too shallow.
- Cast at a visible shadow unless a later Workpedia skill says otherwise.
- Hold the reel input after the hook lands.
- Release pressure before the line warning reaches red.
Bait is chum, not rod equipment
Meat, Veggie, and Bug Bait are thrown into the water to generate or collect fish shadows.
- Travel to the correct habitat before using bait.
- Throw bait into a compact, reachable area.
- Check the target’s exact bait list before spending processed ingredients.
Choose rod, net, or trap by goal
Nets efficiently collect grouped shadows through supported rarities, but King fish still require a rod. Fish Traps work overnight with Advanced Fish Food.
- Use the net for bulk codex or ingredient runs.
- Switch to the rod for King rarity or a specific target.
- Place, feed, collect, and refill traps as part of the daily routine.
Keep the first scarce specimen
Before selling, check recipe, quest, breeding, pond, and Islandpedia requirements.
- Use Steamed Fish before a difficult targeted session; Never Skunked gives immediate bites for 30 seconds.
- Record the selected season, weather, and time in the fish finder.
- Do not assume an ocean fish appears in every offshore zone.
Run a measured chumming pattern instead of continuous throwing
Bait is most useful when each throw answers a question. Stand where several valid green cast points overlap, throw one bait portion, and watch which shadows appear and whether they remain reachable. Cast or net that group before adding more. Continuous chumming can spread shadows beyond comfortable range, obscure how much bait produced the result, and consume ingredients after the target is already present. Use a simple cycle of throw, observe, harvest, and recount. If the water remains unproductive, verify season, weather, time, habitat, and profession requirements before spending another batch. This measured pattern preserves bait and creates a repeatable test that distinguishes poor conditions from unlucky shadow generation or bad casting geometry.
- Choose a shoreline position with several unobstructed green landing markers before throwing bait, because spawning shadows in unreachable water wastes both bait and the condition window.
- Throw a single portion, clear the resulting reachable shadows, and record catches before repeating; this keeps bait efficiency visible even when several species share conditions.
- After two unproductive cycles, stop and recheck the target entry rather than escalating consumption, especially when time, weather, or named water may be wrong, then update the chum log.
Build and test a reliable cast lane
A valid fishing spot is more than the correct water type. The shoreline must provide a clear landing marker, enough depth, a readable shadow approach, and room to repeat casts without repositioning. During flexible hours, test candidate locations with common fish and mark one dependable standing point for each important habitat. Note obstacles, camera angles, and whether moving shadows enter blocked water. When a rare window arrives, use the tested lane instead of scouting under time pressure. If the marker turns red, shift the standing point or aim rather than assuming the target conditions failed. This preparation separates spawn problems from placement problems and makes line-control practice consistent because every attempt begins from the same geometry.
- Test the lane when the target is not urgent, confirming several green landing points at different ranges and a clear path from visible shadow to bobber.
- Save a landmark-based description or map note for the standing position, since naming only the broad river, lake, or beach is not precise enough to reproduce it.
- Keep bait throws inside the proven cast arc and relocate when wind, camera, obstacles, or shallow water repeatedly produces red markers or unreachable shadows, then mark the tested cast lane.
Diagnose a missing target with a condition ladder
When the expected fish does not appear, change only one condition at a time. Start with the broadest errors: correct named region and water type, then season, weather, time, bait, Angler rank, and gear capability. Confirm that shadows are present unless an unlocked Workpedia skill explicitly removes that requirement for the current habitat. Catch one common fish at the same spot to prove the cast lane works, then resume target attempts. Do not immediately move between several nearby waters, because lake, river, ocean, boat grounds, and Moonlit Forest pools can have different tables despite looking similar. A condition ladder turns repeated failure into useful evidence and protects scarce bait from being spent on an impossible setup.
- Verify the exact named water first, especially offshore grounds and Moonlit Forest pools, because matching appearance does not guarantee the same fish table, then update the condition card.
- Check the in-game clock and weather display immediately before chumming; a correct morning plan can become invalid after travel or a window boundary, then update the condition card.
- If common fish bite but the target does not, keep geometry fixed and recheck target-specific bait, profession title, and season before blaming the rod, then update the condition card.
Use traps as an overnight sampling network
Fish Traps are strongest when they answer location and supply questions while active fishing time is spent elsewhere. Place a small, labeled network across waters you can service in one morning loop, feed each trap with the required Advanced Fish Food, and log the next day's catches by location. Keep the initial network small enough that every trap is reliably found, emptied, and refilled. After several nights, remove placements that yield unhelpful duplicates and concentrate on waters supplying recipes, pond candidates, requests, or missing collection entries. Treat trap catches as evidence from that location, not proof that every rod target shares the same conditions. This creates passive output without allowing maintenance and feed production to consume the entire Angler routine.
- Name each trap by a visible landmark and water type, then record feed, catch, and collection date so lost placements or empty cycles are obvious.
- Service traps in a fixed route after morning home chores, carrying replacement feed and enough empty slots to avoid leaving catches behind or mixing records.
- Retire a trap when its repeated output lacks a planned use; redirect feed toward a better sample location instead of maintaining every available water indefinitely.
Frequently asked questions
How do I attach bait to the rod?
You do not. Throw bait directly into the water to create or gather fish shadows.
Can a net catch King fish?
No. Use a fishing rod for King-rarity fish.