
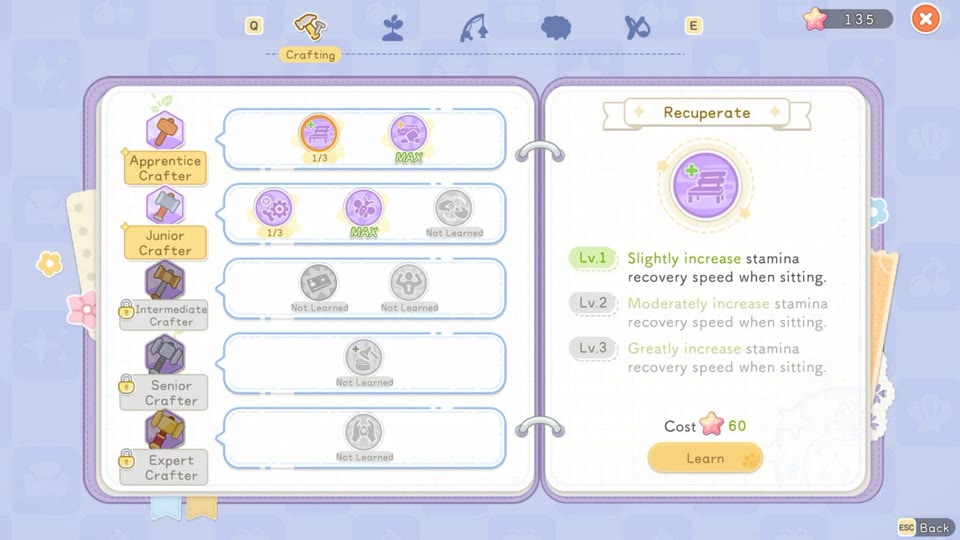

Buy breadth only when Island Life requires a number of skill upgrades. Otherwise, concentrate points in the profession that controls your current bottleneck.
Workpedia opens after the first profession task and supports five ranks from Apprentice to Expert. Skill points are most valuable when they remove work you repeat every in-game day.
Use a four-question skill test
Before buying, ask whether the skill saves daily time, lowers stamina, increases a scarce yield, or prevents a failed run.
- Prefer permanent workflow gains over a small situational bonus.
- Value a perk more highly when it affects many actions per day.
- Leave points unspent when the next rank may reveal a stronger solution.
Prioritize Crafter and Farmer infrastructure
Crafter skills unlock or improve the equipment behind every other route, while Farmer skills pay back through repeated crop cycles.
- Choose processing, storage, tool, and automation gains when queues block progress.
- Take watering, tilling, yield, and seasonal flexibility when field labor dominates the day.
- Do not scale a field before the relevant stamina or watering upgrade exists.
Build Angler, Rancher, and Explorer around goals
These trees become efficient when aimed at a specific target: a King fish, a breeding result, a boss, or a rare forest resource.
- Buy fishing condition and line-control support before a difficult catch session.
- Choose care, breeding, and helper capacity before expanding animal count.
- Prioritize combat safety, ammunition, mining yield, or movement according to the next forest objective.
Re-evaluate at every certification rank
Apprentice, Junior, Intermediate, Senior, and Expert trials change what equipment and routes are available. A former bottleneck may disappear after certification.
- Read the next trial before spending rare materials.
- Save points when a trial unlock is close.
- Update your daily route after a new tool or automation perk changes the optimal order.
Calculate payback in actions, not days
A Workpedia perk should be judged by how many matching actions you actually perform. Estimate the affected actions in one normal session, multiply by how often that session occurs, and compare the result with the alternative skill. A tilling perk may be excellent during field resets but idle between plantings; a processing or gathering benefit may apply across several professions. This action-based view avoids universal tier lists and remains useful when balance values change. Include setup costs as well: a perk that requires special bait, helpers, or a large field may not pay back on a small save. Buy when the skill changes a repeated decision or removes a named constraint, not simply when points are available.
- Count the actions a perk touches during three representative sessions, including ordinary days and peak workloads, then compare totals instead of relying on one unusually busy day.
- Discount bonuses that need scarce consumables or special conditions unless those inputs are already part of the route; theoretical uptime is not the same as practical uptime.
- Recalculate after automation or a tool upgrade, because a skill that saved the most stamina yesterday may become redundant once the underlying manual action disappears.
Build perk packages around a complete workflow
Individual effects become stronger when they support the same beginning-to-end workflow. For Farmer, sowing coverage, harvest handling, seasonal flexibility, and seed renewal answer different stages of crop production. For Angler, bait efficiency, repeated-catch momentum, condition-based rarity, and shadow independence serve different fishing routes. For Explorer, charge speed, ammunition recovery, survival, and boss damage form a coherent expedition package. Choose one package that delivers a finished outcome before buying isolated bonuses across all five trees. The exception is an Island Life requirement that explicitly asks for breadth. Even then, select low-tier skills that remain useful later instead of purchasing effects with no route in your save.
- Write the workflow as inputs, actions, and output; every purchased skill should improve one of those three stages or protect the route from a predictable failure.
- Avoid combining mutually irrelevant conditions, such as night-fishing rarity with a daytime catch route, merely because both perks happen to belong to the same profession tree.
- Complete one functional package before opening another unless certification or Island Life requires a wider skill count; partial packages often leave the original bottleneck untouched.
Test every breakpoint after purchase
Perk descriptions often use relative language, so verify whether a tier crosses a meaningful breakpoint in your own routine. After buying, repeat the same field, fishing session, machine queue, or forest route with the same loadout and record what changed. Did one food item become unnecessary? Did a whole row fit inside one charged action? Did ammunition last through the boss approach? If the answer is no, hold points for a higher tier or another tree. Testing prevents a small statistical gain from being mistaken for a workflow transformation. It also reveals interactions with tools, food, animal traits, and layout that generic advice cannot predict reliably.
- Use a controlled comparison: same route, tool, food, and target; changing several variables at once makes it impossible to attribute the improvement to the purchased skill.
- Record a practical threshold such as trips avoided, feed saved, or casts completed, rather than chasing displayed percentages that may change across patches or platforms.
- If a tier does not cross a breakpoint, stop before the next tier and compare its projected benefit with a different perk that fixes a separate hard failure.
Keep profession profiles for different objectives
The same save needs different skill priorities during expansion, collection, profit, and boss progression. Maintain a short profile for each mode even if respec options are limited or uncertain. An expansion profile values materials, construction, transport, and stamina; a collection profile values access and rarity; a profit profile values repeatable yield and processing continuity; a boss profile values safety and ammunition efficiency. Before a major project, compare the next purchase against the active profile. This prevents yesterday's objective from controlling today's spending. It also clarifies why holding Starsand is rational: unspent currency preserves the option to respond when a new rank reveals a perk that directly serves the next project.
- Name the active profile at the top of the gate ledger and review it only when the project changes, avoiding impulsive switching after one unlucky harvest or fight.
- Give each profile one must-have effect and two supporting effects; a short priority list is easier to fund and audit than an exhaustive ranking of every skill.
- Keep enough Starsand flexibility for the next certification reveal, since later tiers can solve off-season growth, harvest handling, survival, or mobility more directly than early conveniences.
Frequently asked questions
Is the cheapest skill always the best first purchase?
No. A more expensive skill that removes a repeated daily task can repay itself faster.
Why keep skill points unspent?
Later ranks can expose a perk that directly solves a hard gate, while a minor early bonus may not change your route.